
A Complete Vue 3 Setup — Part V

We can draw a parallel between our project and the gif above — but don’t worry, if we don’t stir the cement it hardens! The good news is that we’ve reached the last part of our tutorial and will finally have a complete Vue3 setup.
In this chapter we’ll talk a bit about global state management with Pinia 🍍, consuming Rest APIs with Axios, structuring services, router guard and interceptors, unit testing with Vitest, and finally, translations with VueI18n.
Installing and configuring Pinia
And wouldn’t you know it — “abacaxizin” came to dethrone our beloved VueX in global state management for Vue3? Both work well, so it’s up to you to decide which one you’ll use. First, let’s install Pinia.
yarn add piniaThen we need to configure a few things in our main.ts
// src/main.ts
...
import { createPinia } from 'pinia'

const pinia = createPinia()

app.use(pinia)
...
// Rest of the file
Simple as that! Now let’s show some examples of how to work with global state using Pinia and the Snackbar and Loading components. Inside the stores folder, create the stores/loading and stores/snackbar folders, each with a store file.
// stores/loading/loading.store.ts
import { defineStore } from 'pinia';

export const useLoadingStore = defineStore('loading', {
  state: () => {
    return { LOADING_STATE: false as boolean };
  },
  actions: {
    LOADING_DISPATCH(payload: boolean) {
      this.LOADING_STATE = payload;
    },
  },
});
// stores/snackbar/snackbar.store.ts
import { defineStore } from 'pinia';
import QcSnackbarInterface from './snackbar';
export const useSnackbarStore = defineStore('snackbar', {
state: () => ({
SNACKBAR_STATE: {
model: false,
bgColor: 'primary',
text: 'Alerta!',
icon: 'warning',
actionLabelColor: 'white',
textColor: 'white',
} as QcSnackbarInterface,
}),
actions: {
SNACKBAR_DISPATCH(payload: QcSnackbarInterface) {
this.SNACKBAR_STATE = payload;
},
},
});In addition, we’ll create a file to type our snackbar:
// stores/snackbar/snackbar.d.ts
export default interface QcSnackbarInterface {
  model: boolean;
  bgColor: string;
  text: string;
  icon: string;
  actionLabelColor: string;
  textColor: string;
}
Done — with this we have a boolean controlling our loading and a global object controlling the snackbar, plus a “dispatch” method to change the state when necessary. Remember we left the code commented out inside our Layout.vue? Now we’ll wire state management into it (importing the stores and reading them with storeToRefs), and we can uncomment the QcLoading and QcSnackbar components on the login page too.
// src/views/layout/Layout.vue — <script setup lang="ts">
import { QcLoading, QcSnackbar, QcLayout } from '@denisibanez/design-system-ui';

// STORE
import { storeToRefs } from 'pinia';
import { useLoadingStore } from '@/stores/loading/loading.store';
import { useSnackbarStore } from '@/stores/snackbar/snackbar.store';

// VARIABLES (bind the store to variables)
const { LOADING_STATE } = storeToRefs(useLoadingStore());
const { SNACKBAR_STATE } = storeToRefs(useSnackbarStore());
By doing this, our components are ready to be triggered from anywhere in the application. Here’s an example using the Home.vue file — note we use LOADING_STATE to control the visibility of the content.
// src/views/home/Home.vue
<template>
  <div class="home__wrapper q-pa-md" v-if="!LOADING_STATE">
    <div class="row">
      <div class="col q-pa-md">conteudo</div>
    </div>
  </div>
</template>

<script lang="ts" setup>
import { onMounted } from 'vue';
import { storeToRefs } from 'pinia';
import { useLoadingStore } from '@/stores/loading/loading.store';

const { LOADING_DISPATCH } = useLoadingStore();
const { LOADING_STATE } = storeToRefs(useLoadingStore());

onMounted(() => {
  LOADING_DISPATCH(false);
});
</script>
It’s actually so simple that it’s almost funny! With this we have our global state management working.
Installing Axios, services, interceptor and router guard
In this step we’ll install Axios to consume Rest APIs, configure a services structure, and get the interceptor and router guard ready. Let’s install Axios:
yarn add axios vue-axiosIn the main.ts file we’ll make the following change.
// src/main.ts
import VueAxios from 'vue-axios';
import axios from 'axios';

myApp.use(VueAxios, axios);
...
// rest of the file
Inside the services folder, we’ll create services/template/example.service.js, services/plugins/request.js, services/index.js and services/interceptor.js.
// services/interceptor.js
import { useSnackbarStore } from '@/stores/snackbar/snackbar.store';
const { SNACKBAR_DISPATCH } = useSnackbarStore();
import axios from 'axios';

const axiosApiInstance = axios.create();

// Request interceptor for API calls
axiosApiInstance.interceptors.request.use(
  async (config) => {
    const ACCESS_TOKEN = localStorage.getItem('ACCESS_TOKEN');
    if (ACCESS_TOKEN) {
      config.headers.Authorization = `Bearer ${ACCESS_TOKEN}`;
    }
    return config;
  },
  (error) => {
    Promise.reject(error);
  }
);

// Response interceptor for API calls
axiosApiInstance.interceptors.response.use(
  (response) => response,
  (error) => {
    console.log(error, 'statusCode error');
    if (error.response.status === 403 || error.response.status === 401) {
      SNACKBAR_DISPATCH({
        model: true,
        bgColor: 'negative',
        text: 'Ocorreu um erro!',
        icon: 'check_circle',
        actionLabelColor: 'white',
        textColor: 'white',
      });
      localStorage.removeItem('ACCESS_TOKEN');
      window.location.replace('/login')
    }
    return Promise.reject(error);
  }
);

export default axiosApiInstance;
// services/plugins/request.js
import axiosApiInstance from '@/services/interceptor';
export default async (
{ method, url, body, headers },
success,
error,
done = () => {}
) => {
try {
const res = await axiosApiInstance[method](url, body, { headers });
return await success(res);
} catch (e) {
return await error(e);
} finally {
done();
}
};// services/template/example.service.js
import request from '@/services/plugins/request';
export default {
async getExample(payload, success, error, done) {
return await request(
{ method: 'get', url: `${process.env.VITE__BASE_PATH_EXAMPLE}/api/v1/test` },
success, error, done
);
},
async postExample(payload, success, error, done) {
return await request(
{ method: 'post', url: `${process.env.VITE__BASE_PATH_EXAMPLE}/api/v1/test`, body: payload },
success, error, done
);
},
};
// services/index.js
import example from './template/example.service';
export { example };Note that in the example.service.js file we use process.env (which isn’t native to Vue 3 — I customized it because import.meta would cause issues with testing later) alongside the VITE__BASE_PATH_EXAMPLE variable. To do this, we’ll make a few changes to vite.config.js and create a .env file at the project root.
// vite.config.js
import { defineConfig, loadEnv } from 'vite'
import vue from '@vitejs/plugin-vue'

// https://vitejs.dev/config/
export default defineConfig(({ mode }) => {
  const env = loadEnv(mode, process.cwd())
  // expose .env as process.env instead of import.meta (jest does not import.meta)
  const envWithProcessPrefix = Object.entries(env).reduce(
    (prev, [key, val]) => {
      return {
        ...prev,
        ['process.env.' + key]: `"${val}"`,
      }
    },
    {},
  )

  return {
    define: envWithProcessPrefix,
  }
  ...
  // Rest of the file
})
// .env
VITE__BASE_PATH_EXAMPLE=https://601062cd7a0b4e0017255829.mockapi.io
// You can use any url you want here.Piece by piece: the Interceptor intercepts all axios calls and, on success, adds a token (provided at login) to the request header — useful for authenticated environments. request.js is a “plugin” I created to encapsulate the request’s promise logic, so we reuse code and make it easy to trigger the error, success and finally callbacks. example.service.js shows how to build our services layer, using request.js, process.env and variables to store our paths.
Now let’s use it. First, our login request that provides the token for the other calls — note that here we don’t use the custom services structure, but the plain axios instance, since we don’t want the interceptor to influence this call.
// src/views/login/Login.vue — onSubmit (script)
function onSubmit() {
  loading = ref(true);
  myForm.value.validate().then((success: any) => {
    if (success) {
      const payload = { user: user.value, password: password.value };
      axios.post(`${process.env.VITE__BASE_PATH_EXAMPLE}/api/v1/test`, payload)
        .then(function (response) {
          console.log(response);
          // A fake token here; in the real world an auth service would provision it
          localStorage.setItem('ACCESS_TOKEN', 'teste');
          router.push('/');
        })
        .catch(function (error) {
          console.log(error);
          SNACKBAR_DISPATCH({
            model: true,
            bgColor: 'negative',
            text: 'Erro no request!',
            icon: 'warning',
            actionLabelColor: 'white',
            textColor: 'white',
          } as QcSnackbarInterface);
        })
        .finally(function () {
          loading = ref(false);
        });
    }
  });
}
With our login service configured, here’s an example of using services in src/views/home/Home.vue.
// src/views/home/Home.vue — getExample (script)
import { example } from '@/services/index';

async function getExample() {
  const payload = {};
  LOADING_DISPATCH(true);
  await example.getExample(
    payload,
    (response: any) => {
      console.log(response.data, 'SUCCESS');
      SNACKBAR_DISPATCH({
        model: true, bgColor: 'positive', text: 'Sucesso no request!',
        icon: 'check_circle', actionLabelColor: 'white', textColor: 'white',
      } as QcSnackbarInterface);
    },
    (e: any) => {
      console.log(e, 'ERROR');
      SNACKBAR_DISPATCH({
        model: true, bgColor: 'negative', text: 'Erro no request!',
        icon: 'warning', actionLabelColor: 'white', textColor: 'white',
      } as QcSnackbarInterface);
    },
    () => {
      console.log('DONE');
      LOADING_DISPATCH(false);
    }
  );
}
Now let’s change our logoff method in Layout.vue to clear the token and send the user back to /login.
// src/views/layout/Layout.vue — methods
function onLogoff() {
  localStorage.removeItem('ACCESS_TOKEN');
  router.push('/login');
}
function onNavigate(item: any) {
  router.push(item.route);
}
Now, to finish the services part, let’s configure our router guard so no logged-out user can access our application’s internal routes. Inside our router file we’ll add meta options.
// src/router/router.js
const router = createRouter({
  history: createWebHistory(),
  routes: [
    {
      path: '/',
      component: () => import('@/views/layout/Layout.vue'),
      meta: { requiresAuth: true }, // Note this line
      children: [
        {
          path: '',
          component: () => import('@/views/home/Home.vue'),
          meta: { requiresAuth: true },
        },
      ],
    },
    {
      path: '/login',
      component: () => import('@/views/login/Login.vue'),
      meta: { requiresVisitor: true }, // Note this line
    },
    {
      path: '/:catchAll(.*)*',
      component: () => import('@/views/notFound/ErrorNotFound.vue'),
      meta: { requiresAuth: true },
    },
  ],
});
requiresAuth marks protected routes; requiresVisitor does not. Now in src/main.ts we add the guard (you could also separate it into a src/router/guard.js file).
// src/main.ts — router and Guard
router.beforeEach((to: any, from: any, next: any) => {
  const authVerificate = to.matched.some((record: any) => record.meta.requiresAuth);
  const visitorsVeficate = to.matched.some((record: any) => record.meta.requiresVisitor);
  const loggedIn = localStorage.getItem('ACCESS_TOKEN');
  if (authVerificate) {
    if (!loggedIn) {
      window.location.replace(`${process.env.VITE__BASE_APP}login`);
    } else {
      next();
    }
  } else if (visitorsVeficate) {
    if (loggedIn) {
      window.location.replace('/');
    } else {
      next();
    }
  } else {
    next(); // make sure to always call next()!
  }
});

myApp.use(router);
Done! Now if you’re logged out you won’t be able to access the “/” route; if you’re logged in you won’t be able to access “/login”.
Installing, configuring and using Vitest
In this project we’ll use Vitest to test our components, since Jest still doesn’t work very well together with Pinia. First, install the library.
yarn add -D vitestNow let’s add these scripts to package.json, add the test config to vite.config.js, and install jsdom.
// package.json
"test": "vitest",
"coverage": "vitest run --coverage"

// vite.config.js
export default defineConfig(({ mode }) => {
  ...
  return {
    test: {
      environment: "jsdom"
    },
    ...
  }
})

// then:
yarn add jsdom
Now, if we run “yarn run test:coverage”, a coverage/index.html folder is created at the project root; opening the index, we’ll see something like this:
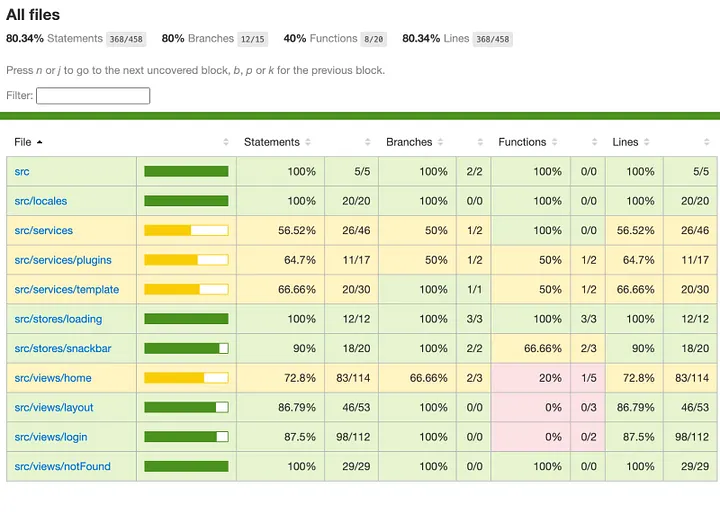
This summary shows the percentage of test coverage in your application, and if we click any of the links, we’ll see in green the lines covered by tests and in red what we still need to test.
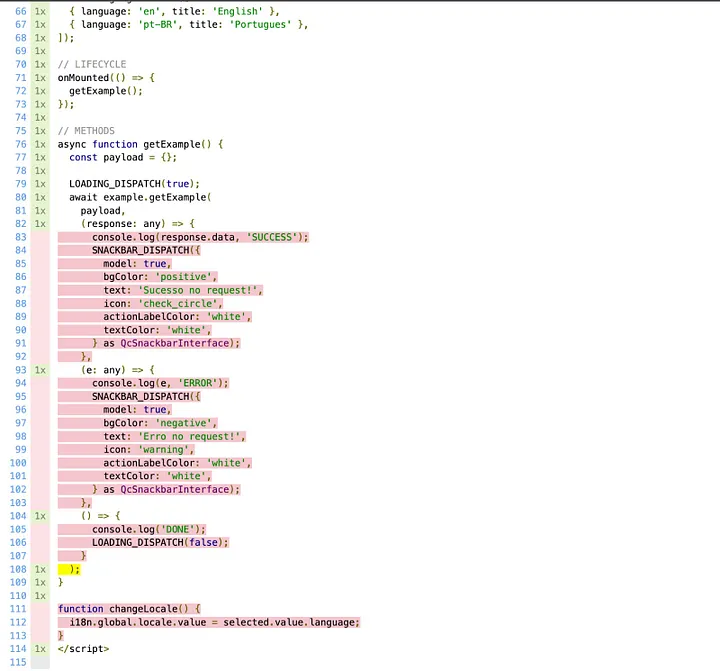
There are countless helpers that assist you during test development. Below is a basic testing example with Vitest.
// src/views/home/Home.test.js
import Home from './Home.vue';
import { shallowMount } from '@vue/test-utils';
import { describe, it, vi, beforeEach, test, expect } from 'vitest';

// A lib we'll need to install to mock pinia
import { createTestingPinia } from '@pinia/testing';

// A translation lib we'll install next
import { useI18n } from 'vue-i18n';

vi.mock('vue-i18n');

useI18n.mockReturnValue({
  t: (tKey) => tKey,
});

describe('Home Component', () => {
  let wrapper = null;

  beforeEach(() => {
    wrapper = shallowMount(Home, {
      global: {
        plugins: [
          createTestingPinia({
            initialState: {},
            stubActions: false,
            createSpy: vi.fn,
          }),
        ],
      },
    });
  });

  test('Home Component renders', () => {
    expect(wrapper).toBeTruthy();
  });
});
Installing, configuring and using VueI18n
“The book is on the table.” — Any Brazilian

In this last but not least section, we’ll install VueI18n, giving our application support for multiple languages! Let’s install the library.
yarn add vue-i18n@8We’ll create some files inside the locales folder: src/locales/pt/pt-BR.json, src/locales/en/en.json and src/locales/index.js.
// src/locales/pt/pt-BR.json
{
  "test": "Esse é um teste!"
}

// src/locales/en/en.json
{
  "test": "This is a test!"
}

// src/locales/index.js
import { createI18n } from 'vue-i18n';
import en from './en/en.json';
import pt from './pt/pt-BR.json';

export default createI18n({
  legacy: false,
  globalInjection: true,
  locale: 'pt',
  fallbackLocale: 'en',
  silentTranslationWarn: true,
  fallbackWarn: false,
  missingWarn: false,
  messages: {
    en: en,
    pt: pt,
  },
});
Now import src/locales/index.js into src/main.ts, and configure vite.config.js with the i18n plugin.
// src/main.ts
import i18n from './locales';
myApp.use(i18n);

// vite.config.js
import VueI18nPlugin from "@intlify/unplugin-vue-i18n/vite";

export default defineConfig(({ mode }) => {
  return {
    plugins: [
      ...
      VueI18nPlugin({
        include: resolve(dirname(fileURLToPath(import.meta.url)), './src/locales/**'),
      }),
    ],
  }
})

// install the helper libs:
yarn add @intlify/eslint-plugin-vue-i18n @intlify/unplugin-vue-i18n
As the last step of this configuration, we’ll modify the .eslintrc.cjs file to add the i18n plugin and its rules.
// .eslintrc.cjs
module.exports = {
  ...
  "extends": [
    ...
    'plugin:@intlify/vue-i18n/recommended'
  ],
  "rules": {
    '@intlify/vue-i18n/no-dynamic-keys': 'error',
    '@intlify/vue-i18n/no-unused-keys': ['error', { extensions: ['.js', '.vue'] }],
    "@intlify/vue-i18n/no-missing-keys-in-other-locales": ["error", { "ignoreLocales": ['en', 'pt-BR'] }],
  },
  "settings": {
    'vue-i18n': {
      localeDir: './src/locales/*.{json,json5,yaml,yml}',
    }
  }
}
We’re done, phew! It took me a while to gather information to get this translations part working with Vue3 and Vite, so there may be unnecessary settings, especially in the lint part — it’s worth testing and removing whatever is unnecessary. Now let’s actually use our translation with an example on the home page.
<template>
  <div class="home__wrapper q-pa-md" v-if="!LOADING_STATE">
    <div class="row">
      <!-- language selector -->
      <div class="col q-pa-md">
        <q-select
          outlined
          v-model="selected"
          :options="languages"
          :option-value="'language'"
          :option-label="'title'"
          @update:model-value="changeLocale()"
          label="Selecione a linguagem desejada"
        />
      </div>
      <div class="col q-pa-md">
        <!-- the translated text -->
        {{ t('test') }}
      </div>
    </div>
  </div>
</template>

<script lang="ts" setup>
import { ref } from 'vue';
import { useI18n } from 'vue-i18n';
import i18n from '@/locales';

const { t } = useI18n({ inheritLocale: true, useScope: 'local' });
const selected = ref();
const languages = ref([
  { language: 'en', title: 'English' },
  { language: 'pt-BR', title: 'Portugues' },
]);

function changeLocale() {
  i18n.global.locale.value = selected.value.language;
}
</script>
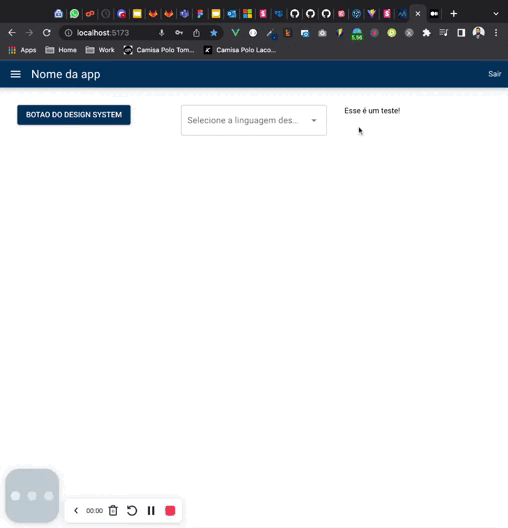
With this, you’ll see something like this on the screen.
Conclusion
My dear Padawans, it is with great emotion that I declare our tutorial concluded. Our path was arduous, but I thank everyone who followed along, and I hope you enjoyed the tips and that I managed to help you in some way on your journey. May the force be with you!
UPDATE: When using the project created with Vite, you may get an error when trying to use lang=“scss” in your styles; fix this by installing sass. And the idea is to keep evolving the structure, so I upload changes to the repository whenever possible.